fbpx

Installation Instructions

Click on the buttons below to see the specific product PDF.

i4F

The installation process outlined here includes the use of 2 planks as an alignment guide (planks 0 & 3 shown above). Make sure plank 0 is centered across planks 1 and 2. Planks should be staggered in a brick laying pattern. The length of a plank must be at least 30cm/11.8 inches.

Installation pattern

The installation process outlined here includes the use of 2 planks as an alignment guide (planks 0 & 3 shown above). Make sure plank 0 is centered across planks 1 and 2. Planks should be staggered in a brick laying pattern. The length of a plank must be at least 30cm/11.8 inches.

Tools needed: spacers, pencil, tape measure, level, cutter knife, hard PVC mallet. Optional: Plinths. Underlay: To be placed before installation if not pre-attached to flooring panels.

Tools

Tools needed: spacers, pencil, tape measure, level, cutter knife, hard PVC mallet.
Optional: Plinths.
Underlay: To be placed before installation if not pre-attached to flooring panels

Acclimatize your floor panels for 48 hours prior to installation at a room temperature between 18 to 25 degrees Centigrade, that is 64 to 77 degrees Fahrenheit.

Preparation

  • Calculate the surface area (length x width) and add 10%.
  • Acclimatize your floor panels for 48 hours prior to installation at a room temperature between 18 to 25 degrees Centigrade, that is 64 to 77 degrees Fahrenheit.
  • Ensure your subfloor is clean, even and stable. Maximum allowed height difference is 5mm/0.2 inches over a distance of 2m/6.6 feet.
  • Check for any peaks or depressions in your subfloor and if they exist fill them up with patching compound.
  • Remove any last obstructions such as glue, nails or screws.
  • Check the floor panels for any damages.
Align installation It is very important that the first 2 rows are aligned. Use a full plank (0) as an alignment guide and place it against the wall. No need for spacers yet.

Align installation

It is very important that the first 2 rows are aligned. Use a full plank (0) as an alignment guide and place it against the wall. No need for spacers yet.

Install plank 1 Next, take another full length plank, angle it into the middle of the long side of plank 0 and drop. Ensure there are no gaps.

Install plank 1

Next, take another full length plank, angle it into the middle of the long side of plank 0 and drop. Ensure there are no gaps.

Install plank 2 Take another full length plank and angle it into plank 0. Then slide plank 2 until the short side makes contact with the short side of plank 1.

Install plank 2

Take another full length plank and angle it into plank 0. Then slide plank 2 until the short side makes contact with the short side of plank 1.

Engage the short sides Drop the short side of plank 2 onto the short side of plank 1. Drop & Lock by pushing down firmly, if necessary use a hard PVC mallet to tap the joints slightly on the short side to secure. This ensures 3-fold locking.

Engage the short sides

Drop the short side of plank 2 onto the short side of plank 1. Drop & Lock by pushing down firmly, if necessary use a hard PVC mallet to tap the joints slightly on the short side to secure. This ensures 3-fold locking.

Align installation Use a full plank (3) as an alignment guide by placing it against the wall. Angle plank 3 into plank 2.

Align installation

Use a full plank (3) as an alignment guide by placing it against the wall.
Angle plank 3 into plank 2.

Install plank 4 Take another full length plank and angle it into plank 3. Then slide plank 4 until the short side makes contact with the short side of plank 2. Drop & Lock by pushing the planks firmly down, if necessary use a hard PVC mallet to tap the joints slightly on the short side to secure. Ensure there are no gaps or height differences.

Install plank 4

Take another full length plank and angle it into plank 3. Then slide plank 4 until the short side makes contact with the short side of plank 2. Drop & Lock by pushing the planks firmly down, if necessary use a hard PVC mallet to tap the joints slightly on the short side to secure. Ensure there are no gaps or height differences

Finish rows 1 and 2 Start your second row by using half a plank (5) and angle in with plank 1. Make sure the short sides are aligned. Repeat the same steps as above to finish the second row. Ensure there are no gaps or height differences.

Finish rows 1 and 2

Start your second row by using half a plank (5) and angle in with plank 1.
Make sure the short sides are aligned. Repeat the same steps as above to finish the second row. Ensure there are no gaps or height differences.

Remove alignment planks (planks 0 & 3) Remove planks 0 and 3 by angling them out.

Remove alignment planks (planks 0 & 3)

Remove planks 0 and 3 by angling them out.

Use spacers & slide rows towards spacers Place the spacers along the walls to create an expansion space of 5mm/0,2 inches. Proceed by gently sliding rows 1 and 2 towards the spacers.

Use spacers & slide rows towards spacers

Place the spacers along the walls to create an expansion space of 5mm/0,2 inches. Proceed by gently sliding rows 1 and 2 towards the spacers.

Finalize installation From row 3 onwards, installation does not require a specific laying pattern. To finish the last row, measure the distance from the wall to the last installed row minus 5mm/0.2 inches. Remove spacers when installation is complete. Finish up the room by placing any plinths, molding and trim.

Finalize installation

From row 3 onwards, installation does not require a specific laying pattern.
To finish the last row, measure the distance from the wall to the last installed row minus 5mm/0.2 inches. Remove spacers when installation is complete. Finish up the room by placing any plinths, molding and trim.

Välinge

Important Information

  • Packages must be acclimated a minimum of 24 to 48 hours prior to installation in the room where the installation will take place.
  • In rooms larger than 10 x 10 m (100 m2), the flooring must be installed in smaller sections with expansion joints.
  • The distance to walls and other permanent pieces of construction elements (such as pillars and kitchen islands) should be approximately 5 mm.
  • Never install very heavy pieces of furniture such as kitchen islands/cabinets on top of the flooring.
  • The indoor climate should have a temperature between 15-23°C and relative air humidity between 30-60% (according to Swedish Standards Institute).
  • Tools needed: spacers, pencil, tape measure, level, cutter knife, hard PVC mallet.

General installation instructions

First plank, first row Place a spacer with predicted thickness to the left and position the panel against the wall. Later, after 3 rows, you can easily position the flooring against the front wall with predicted spacers.

First plank, first row

Place a spacer with predicted thickness to the left and position the panel against the wall.
Later, after 3 rows, you can easily position the flooring against the front wall with predicted spacers

Second plank, first row Press the short end of the next plank at an angle to the first one, and then fold down. Complete the first row in the same way.

Second plank, first row

Press the short end of the next plank at an angle
to the first one, and then fold down.
Complete the first row in the same way

At the end of the first row, put a spacer to the wall and measure the length of the last panel to fit.

At the end of the first row, put a spacer to the wall
and measure the length of the last panel to fit.

Second row First panel min length > 400 mm. Put a spacer against the left wall.

Second row

First panel min length > 400 mm.
Put a spacer against the left wall.

Staggered joint distance i.e. minimum distance between short ends of panels in parallel rows shall not be less than the given length.

Staggered joint distance i.e. minimum distance
between short ends of panels in parallel rows shall not be less than the given length.

Place the plank and angle against the plank in the previous row, press forward and fold down at the same time. Leave the plank in a somewhat up angled position when the planks start to lock. To make this further easier, a wedge with the suitable angle can be placed under the plank near the short side joint as support.

Place the plank and angle against the plank in the previous row, press forward and fold down at the same time. Leave the plank in a somewhat up angled position when the planks start to lock. To make this further easier, a wedge with the suitable angle can be placed under the plank near the short side joint as support.

Second plank, second row Place the short end of the plank at an angle against the previous installed plank and fold down all the way.

Second plank, second row

Place the short end of the plank at an angle against the previous installed plank and fold down all the way.

Second plank, second row Place the short end of the plank at an angle against the previous installed plank and fold down all the way.

Second plank, second row

Place the short end of the plank at an angle against the previous installed plank and fold down all the way.

After 2-3 rows Adjust the distance to the front wall by placing distances. Keep the distances in position during the entire time of installation and remove once the installation is completed.

After 2-3 rows

Adjust the distance to the front wall by placing distances. Keep the distances in position during the entire time of installation and remove once the installation is completed.

Last row (and perhaps also first row). Minimum width 50 mm. Place a spacer to the wall before measuring. Make a simple drawing tool (piece of wood with a hole) and mark the panel along the wall. Cut the panels > 400 lengthwise including the flexible tongues.

Last row (and perhaps also first row).

Minimum width 50 mm. Place a spacer to the wall before measuring. Make a simple drawing tool (piece of wood with a hole) and mark the panel along the wall. Cut the panels > 400 lengthwise including the flexible tongues.

Installation around radiator/heating pipes

Drill holes two times larger than the diameter of the pipes. Remove a piece of the panel with a utility knife.
Put the panel on one side of the pipes and the removed piece on the other side.

Drill holes two times larger than the diameter of the pipes.
Remove a piece of the panel with a utility knife. Put the panel on one side of the pipes and the removed piece on the other side.

When angling is not possible

When angling is not possible, remove the vertical locking part of the strip with a chisel.
Put applicable glue on the strip and push the panels horizontally together. Place some spacers between last board and the wall.

Remove the vertical locking part of the strip with a chisel, put applicable glue on the strip and push the panels horizontally together. Place some spacers between last board and the wall.

Dismantling panels

First plank, first row Place a spacer with predicted thickness to the left and position the panel against the wall. Later, after 3 rows, you can easily position the flooring against the front wall with predicted spacers.

Separate the whole row by carefully lifting up and
release the whole row.


Fold up the row and release the whole long side.

Second plank, first row Press the short end of the next plank at an angle to the first one, and then fold down. Complete the first row in the same way.

Disassemble the panels by angling the short sides up vertically.

Unilin

Tools needed: spacers, pencil, tape measure, level, cutter knife, hard PVC mallet. Optional: Plinths. Underlay: To be placed before installation if not pre-attached to flooring panels.

Preparation

Tools needed: spacers, pencil, tape measure, level, cutter knife, hard PVC mallet.
Optional: Plinths.
Underlay: To be placed before installation if not pre-attached to flooring panels

Acclimatize your floor panels for 48 hours prior to installation at a room temperature between 18 to 25 degrees Centigrade, that is 64 to 77 degrees Fahrenheit.

Preparation

  • Calculate the surface area (length x width) and add 10%.
  • Acclimatize your floor panels for 48 hours prior to installation at a room temperature between 18 to 25 degrees Centigrade, that is 64 to 77 degrees Fahrenheit.
  • Ensure your subfloor is clean, even and stable. Maximum allowed height difference is 5mm/0.2 inches over a distance of 2m/6.6 feet.
  • Check for any peaks or depressions in your subfloor and if they exist fill them up with patching compound.
  • Remove any last obstructions such as glue, nails or screws.
  • Check the floor panels for any damages.

Flooring Installation

During installation, make sure that you mix up the floor panels sufficiently so that there are not too many identical, lighter or darker panels next to each other. To obtain the best visual effect, it is best to fit the panels in the direction of the longest wall and parallel to the incidence of light. Ensure that the end joints of the panels in 2 successive rows are never in line, they should be staggered by at least 30 cm.
Measure the room before you start fitting. Make sure that the last row of panels is at least 2 inches wide when finishing the installation.
CORELOGIC SPC has been designed for indoor heated (> 0°C) (32°F) installations. It cannot be installed in solariums, seasonal porches, camping trailers, boats or unheated applications without being glued. If the temperature of your floor raises above 45°C, for instance due to direct sunlight, it is recommended to use the Sun/Heat underlay or to install without underlay on a levelled mineral subfloor. If you have any concerns about the temperature of your floor, please contact us.
First, start in the left corner of the room and fit an underlay if needed. The underlay should be installed progressively together with the floor installation. An underlay which is too soft or made from the wrong material will damage your floor. A laminate/parquet underlay is not suitable for click SPC. You can find out more information about them and how to use them on the packaging of your underlay or from your dealer. Start the first row with a whole plank. Cut off the long side tongue of the click of first panel.
Fit the plank with cut off sides against the walls. Make sure that you leave an expansion joint of 2mm. For installations with floor heating, we recommend to leave an expansion gap of 5mm.
CORELOGIC SPC can easily be cut using a cutter or utility knife with the decor side face up. When cutting the SPC plank, mark the line and use the knife to make a firm cut in the surface. Then break off the plank using both hands.
  1. During installation, make sure that you mix up the floor panels sufficiently so that there are not too many identical, lighter or darker panels next to each other.
    To obtain the best visual effect, it is best to fit the panels in the direction of the longest wall and parallel to the incidence of light. Ensure that the end joints of the panels in 2 successive rows are never in line, they should be staggered by at least 30 cm.
  2. Measure the room before you start fitting. Make sure that the last row of panels is at least 2 inches wide when finishing the installation.
  3. CORELOGIC SPC has been designed for indoor heated (> 0°C) (32°F) installations. It cannot be installed in solariums, seasonal porches, camping trailers, boats or
    unheated applications without being glued. If the temperature of your floor raises above 45°C, for instance due to direct sunlight, it is recommended to use the
    Sun/Heat underlay or to install without underlay on a levelled mineral subfloor. If you have any concerns about the temperature of your floor, please contact us.
  4. First, start in the left corner of the room and fit an underlay if needed. The underlay should be installed progressively together with the floor installation. An
    underlay which is too soft or made from the wrong material will damage your floor. A laminate/parquet underlay is not suitable for click SPC. You can find out more information about them and how to use them on the packaging of your underlay or from your dealer. Start the first row with a whole plank. Cut off the long side tongue of the click of first panel.
  5. Fit the plank with cut off sides against the walls. Make sure that you leave an expansion joint of 2mm. For installations with floor heating, we recommend to leave an expansion gap of 5mm.
  6. CORELOGIC SPC can easily be cut using a cutter or utility knife with the decor side face up. When cutting the SPC plank, mark the line and use the knife to make a firm cut in the surface. Then break off the plank using both hands.
CORELOGIC SPC can easily be cut using a cutter or utility knife with the decor side face up. When cutting the SPC plank, mark the line and use the knife to make a firm cut in the surface. Then break off the plank using both hands.
Then slide the third plank together horizontally. Slightly lift the plank to be installed by holding your hand underneath. Push the short side joint down gently with your thumb moving from the inner corner towards the outside until you hear a “click”. Ensure the short side ends are closed by knocking gently on the short side click connection with your wrist. Don’t use a hammer or tapping block as it may possible harm your click connection.
Now connect the panels of the first two rows on the short sides. Check the expansion gap of and make sure the first rows are on a perfect straight line. You can check this by holding a thin rope along the installed planks and adjust the straightness of your floor when necessary. An expansion gap of 0.08 inch(2mm) along the perimeter should be maintained. In the width and in the length direction of the planks there is no need for extra expansion gaps.
When the remaining piece of underlay is shorter than the width of a panel, install the next underlay. It is recommended to connect underlays using thin tape.
Continue the installation like this row by row towards the end of the room. Always check each joint before continuing. You can press down gently with your thumb on top of every short end joint to ensure good locking.

7. CORELOGIC SPC can easily be cut using a cutter or utility knife with the decor side face up. When cutting the SPC plank, mark the line and use the knife to
make a firm cut in the surface. Then break off the plank using both hands.
8. Then slide the third plank together horizontally. Slightly lift the plank to be installed by holding your hand underneath.
Push the short side joint down gently with your thumb moving from the inner corner towards the outside until you hear a “click”. Ensure the short side ends are
closed by knocking gently on the short side click connection with your wrist. Don’t use a hammer or tapping block as it may possible harm your click connection.
9. Now connect the panels of the first two rows on the short sides.
Check the expansion gap of and make sure the first rows are on a perfect straight line. You can check this by holding a thin rope along the installed planks and
adjust the straightness of your floor when necessary. An expansion gap of 0.08 inch(2mm) along the perimeter should be maintained. In the width and in the
length direction of the planks there is no need for extra expansion gaps.
10. When the remaining piece of underlay is shorter than the width of a panel, install the next underlay. It is recommended to connect underlays using thin tape.
11. Continue the installation like this row by row towards the end of the room. Always check each joint before continuing. You can press down gently with your
thumb on top of every short end joint to ensure good locking.

Finishing

Inspect the final surface of the installed floor. Install the skirtings against the wall but never attach the skirting to the floor itself. In places where profiles or skirtings cannot be placed, fill the expansion gaps with an elastic filler.
When the new flooring meets a threshold or a doorway, we recommend undercutting the moldings. To secure the right cut, turn a plank upside down and place it on the floor up to the door frame. Then place the hand saw flat against the plank and simply cut through the frame. Remove the cut out and vacuum away debris. You can now simply click the plank in on the long side at the side of the undercutted molding. Use the installation tool as a pull bar to secure absolute tightness in the long and short joint.
If it is difficult to tilt the planks (e.g. under radiators), use the installation tool to pull the panels together.
In rows where there is a pipe, make sure the pipe falls exactly in line with the short side of two panels. Take a drill bit with the same diameter as the pipe plus 10 mm. Click the panels together on the short side and drill a hole centered on the joint between the two panels. Now you can install the panels.
In case of a double pipe, drill a hole at each of the marked points that is equivalent to the diameter of the pipes plus 10 mm. If located on the long side of the plank, make a 45 degree cut from each hole to the edge of the plank.
Then, using an appropriate glue along the cut edges of the piece you cut out, glue the piece in place. Be sure no glue comes between the cut out piece and the subfloor.
  1. Inspect the final surface of the installed floor. Install the skirtings against the wall but never attach the skirting to the floor itself. In places where profiles or
    skirtings cannot be placed, fill the expansion gaps with an elastic filler.
  2. When the new flooring meets a threshold or a doorway, we recommend undercutting the moldings. To secure the right cut, turn a plank upside down and
    place it on the floor up to the door frame. Then place the hand saw flat against the plank and simply cut through the frame. Remove the cut out and vacuum
    away debris. You can now simply click the plank in on the long side at the side of the undercutted molding. Use the installation tool as a pull bar to secure
    absolute tightness in the long and short joint.
  3. If it is difficult to tilt the planks (e.g. under radiators), use the installation tool to pull the panels together.
  4. In rows where there is a pipe, make sure the pipe falls exactly in line with the short side of two panels. Take a drill bit with the same diameter as the pipe plus
    10 mm. Click the panels together on the short side and drill a hole centered on the joint between the two panels. Now you can install the panels.
  5. In case of a double pipe, drill a hole at each of the marked points that is equivalent to the diameter of the pipes plus 10 mm. If located on the long side of the
    plank, make a 45 degree cut from each hole to the edge of the plank.
  6. Then, using an appropriate glue along the cut edges of the piece you cut out, glue the piece in place. Be sure no glue comes between the cut out piece and
    the subfloor.

Maintenance

It is allowed to use a vacuum cleaner on your SPC floor. The use of a steamcleaner is forbidden.
Your SPC floor can be cleaned with a damp or wet mop. Always remove spilled liquids immediately from the floor.
Protect your CoreLogic floors from rips.
While CoreLogic flooring is extremely durable, it can be ripped by dragging heavy furniture across it.
Extreme temperatures can damage CoreLogic LVP.
  1. It is allowed to use a vacuum cleaner on your SPC floor. The use of a steamcleaner is forbidden.
  2. Your SPC floor can be cleaned with a damp or wet mop. Always remove spilled liquids immediately from the floor.
  3. Protect furniture and chair legs. Use (office) chairs type W and seats with soft wheels that are suitable for a vinyl floor and/or use a suitable desk mat.
  4. Never drag heavy items of furniture over the floor but lift them up. Make sure furniture legs have a large surface and are provided with non-staining floor
    protectors. The taller and/or wider the furniture feet are, the greater the repartition of weight will be on the floor and the less chance there is to damage the
    floor. Place non-rubber backed mats at all outside entrances to prevent dirt, grit and soil from being tracked onto your floor. This will reduce damages, the
    maintenance requirement and extend the life of your floor. Please note that prolonged contact with rubber can cause a permanent stain. Do not allow
    cigarettes, matches or other very hot items to contact the floor as this may cause permanent damage.
  5. Ensure that the indoor climate conditions are always kept >0°C(32°F) and preferably between 18-30°C (64-86°F). If the floor temperature exceeds 45°C(113°F),
    use the Sun/Heat underlay or install without underlay on a levelled mineral subfloor.

Patriot Plank Loose Lay

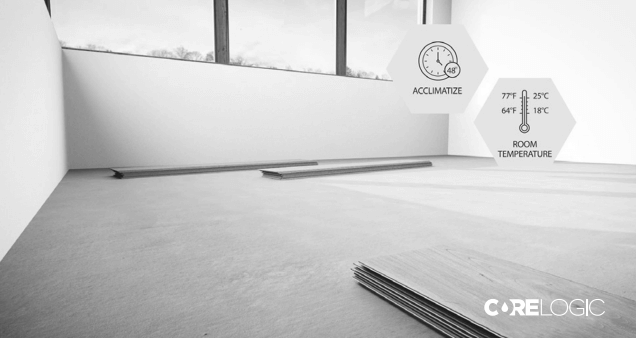
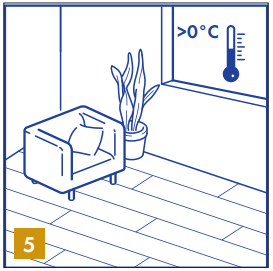
The following instructions detail the installation and maintenance of Patriot Plank Loose Lay Plank (LLP) by Frontier Surfaces. To start, it is recommended that you store the tiles in a location that is not subject to extreme temperature changes, and away from direct sunlight, heaters, or air vents. It is important to ensure that the planks, as well as the pressure-sensitive adhesive and subfloor, are allowed to stabilize to a constant temperature between 64°F and 77°F. The tiles should be kept in these conditions for at least 24 to 48 hours before installation.


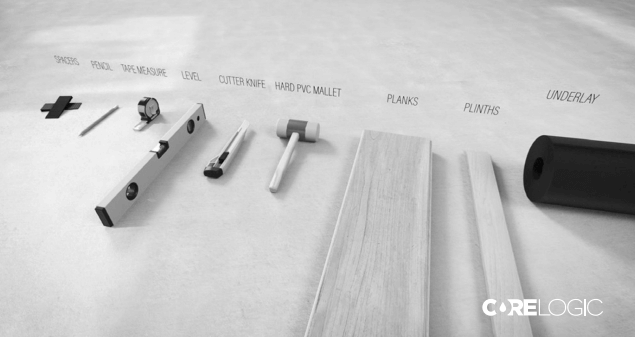
Before installation, it is important to visit the job site to confirm conditions and floor measurements. Always check the flooring material to ensure that they are the correct glue down/LLP product, color, and from the same lot.


The subfloor must be clean, dry, smooth, structurally sound, and free of paint varnish, existing adhesives, oil, grease, solvents, and other extraneous material. The subfloor must be kept dry and have a moisture content of less than 4.5%, and any cracks in the subfloor should be treated properly. Lightweight concrete should be avoided unless adding more reinforcing agent to it. Wood subfloors should consist of standard double-layer construction, with a finished thickness of at least 1 inch and 18 inches of wellventilated air space underneath. Crawl spaces should be insulated and protected by a vapor barrier. Be careful of installation on and around nail holes or uneven places.


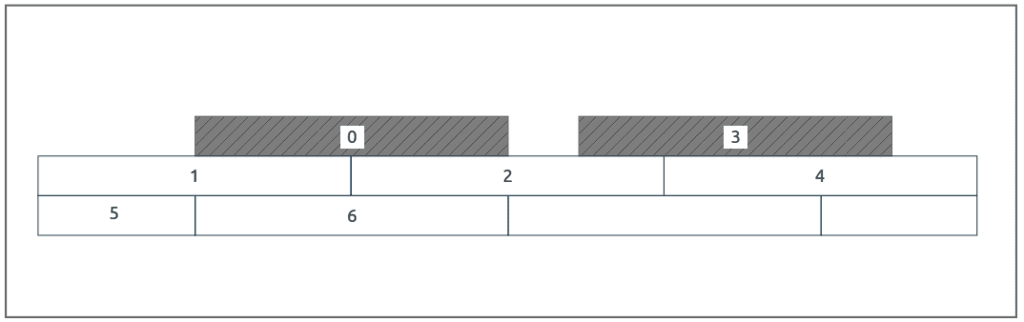
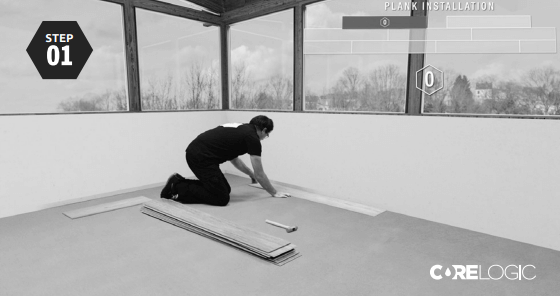
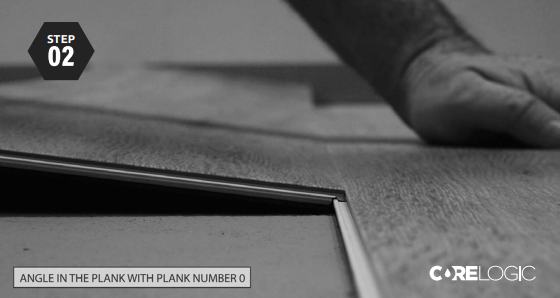
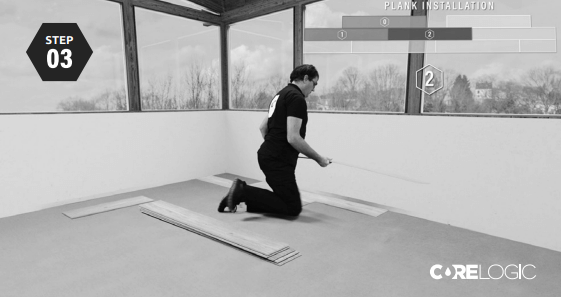
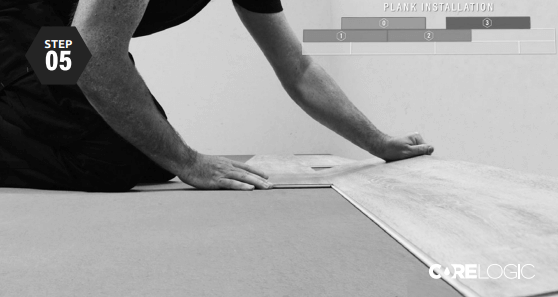
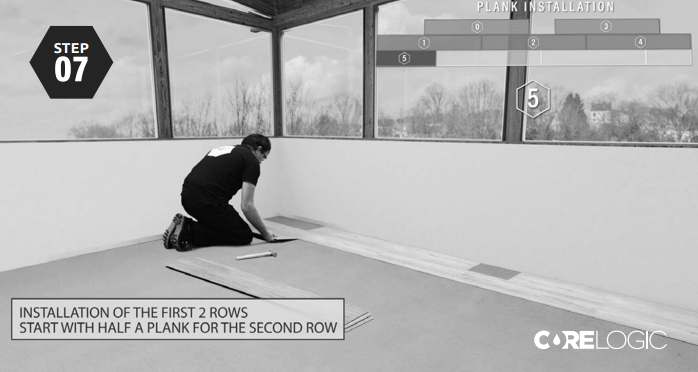
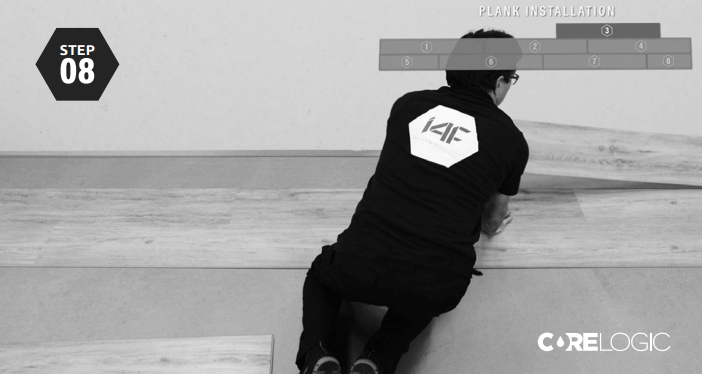
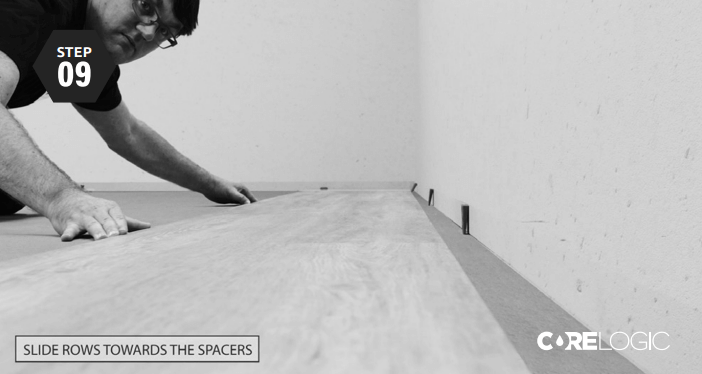
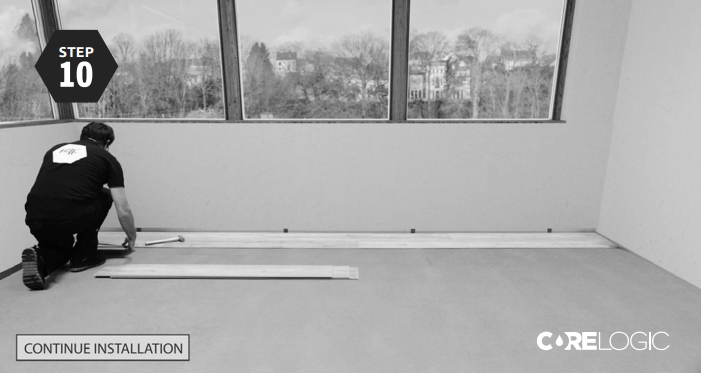
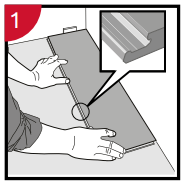
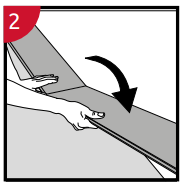
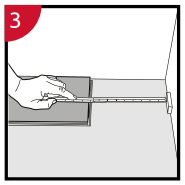
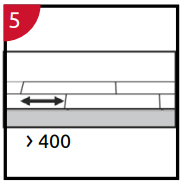
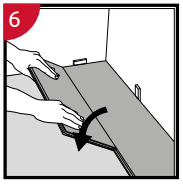
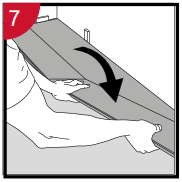
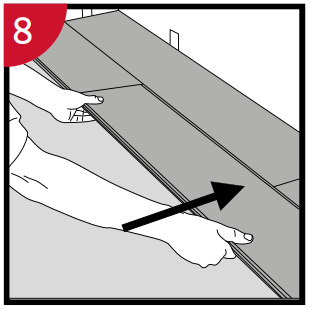
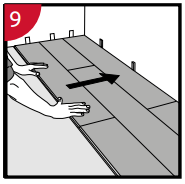
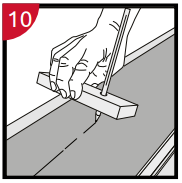
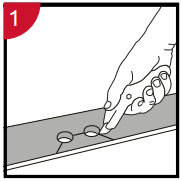
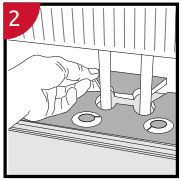
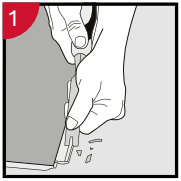
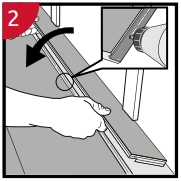
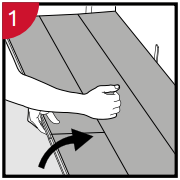
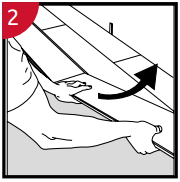
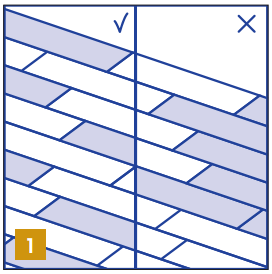
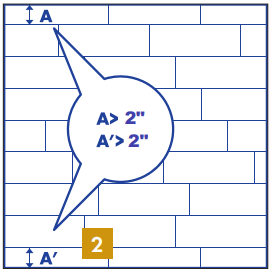
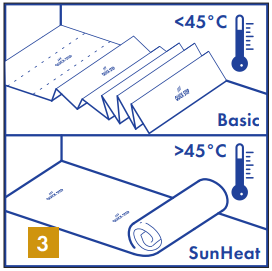
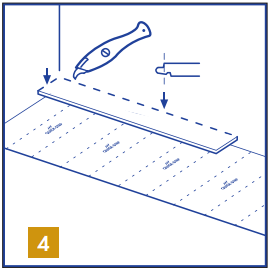
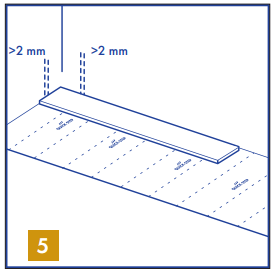
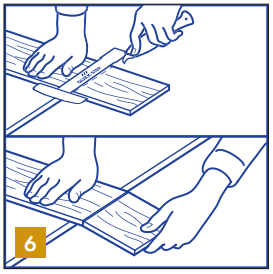
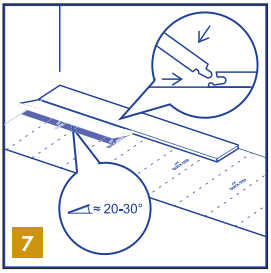
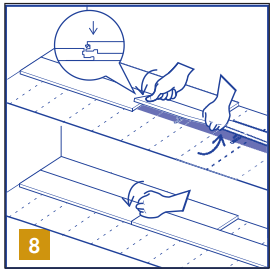
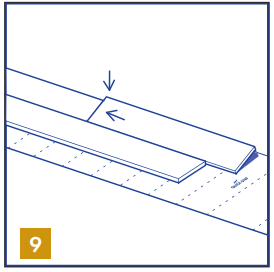
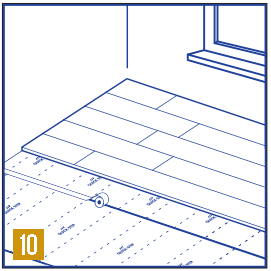
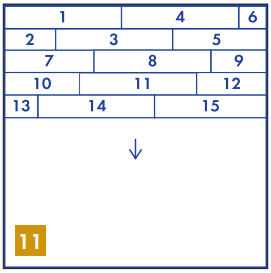
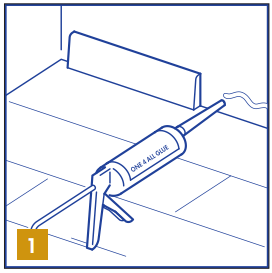
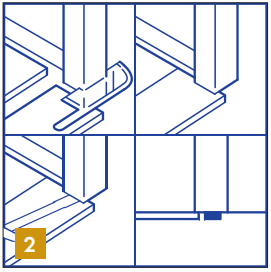
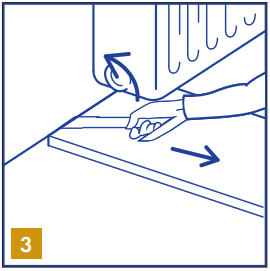
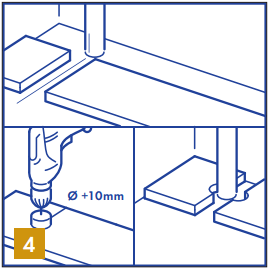
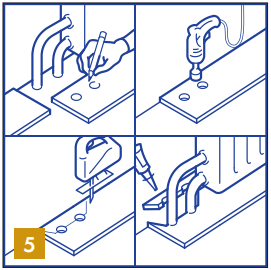
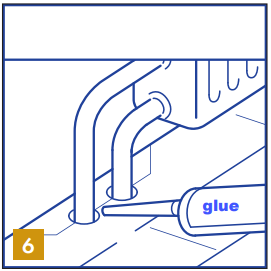
When installing the LLP, keep the product at a temperature range of 64°F to 77°F. If installing at a temperature lower than 64°F, use an appropriate thickness spacer to install the tiles in regular space. Conversely, when installing at a temperature higher than 77°F, install the tiles tightly together. Leave a gap of around 1/8” to 1/4” between the product and the wall when installing LLP at the end of the wall, depending on the size of the installing area. These spaces can be covered with base molding. When installing LLP at the entrance of the door, place a supporter after installation, or use pressure-sensitive adhesives up to about 19.5” from the edges for installation. The maximum area that can be installed without an expansion joint is 32.5 ft x 32.5 ft. Installation with pressuresensitive adhesive is required for areas where heavy objects, such as furniture and refrigerators, are expected to move after installation. Cut the LLP vertically to prevent each tile from curling up after installation. Construction debris can damage the floor surface, so please cover the floor with protective paper or hardboard for protection while installing.

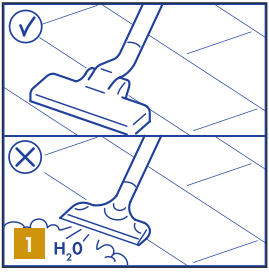
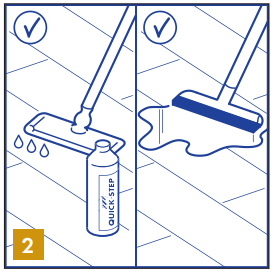
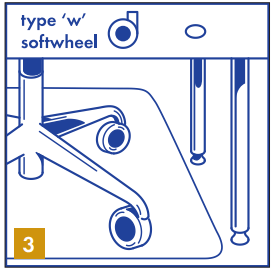
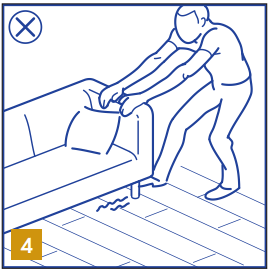
After installation, use a dry cloth or a vacuum cleaner for cleaning. When using water or any cleaning liquid, be sure to squeeze out all water before cleaning. To use wax on the floor surface, clean the floor surface thoroughly and apply wax after drying. Keep all floor traffic away from the floor until the wax dries. Be careful when moving heavy objects, such as furniture or refrigerators, to prevent damage and scratches. Use window coverings to protect the floor from fading under direct sunlight.


To maintain the LLP, clean the floor surface regularly. Use a dry cloth or vacuum cleaner for cleaning. Prevent solvent or water from penetrating into seams to avoid damage or mold growth on the floor. Periodically wax the floor surface for maintenance. Place a mat at the entrance of the bathroom and remove any contaminants as soon as possible.

Lastly, it is important to note that any damage to the LLP caused by improper installation, excessive moisture, or other factors not related to manufacturing defects is not covered by the warranty. It is crucial to follow these instructions carefully to ensure the longevity of your LLP flooring. If you have any additional questions about the installation or maintenance of your LLP, please contact Frontier Surfaces for assistance.

Patriot Plank Glue Down

This document provides instructions for installing and maintaining glue down Corelogic Patriot Plank LVT.


To prepare the floor, ensure it is properly cured and dried to less than 4.5% moisture content, which may take 30 days in a new building at 68°F and 65% humidity. Make sure the substrate is stable and free of dust particles. Remove any contaminants such as varnish, paint, lacquer, and wax, and ensure the floor is free of irregularities or unevenness. Use sufficient materials to fill in cracks and pits to have a surface smooth before installation.


During installation, secure the required number of tiles from the same LOT to prevent color differences. Install tiles after all other construction work is completed or protect installed products with a cover if installation is required to be done simultaneously. Condition tiles and adhesives at the site for at least
24 hours at 64-72°F before installation and stop heating at least 3 hours prior to installation. Do not install tiles on wood or existing PVC flooring, as this may cause shrinkage or swelling. Check the construction drawing and consult with responsible site staff as needed.


When installing the tiles, draw an ink line according to the construction drawing and have the responsible staff check it. Turn a can of adhesive upside down for 20 minutes and shake it well before application. Apply an adequate amount of adhesive evenly to a portion of the area and avoid applying it
to a larger area than necessary to prevent hardening of the adhesive. Install tiles in the same direction according to the arrow mark on the back to prevent color differences and maintain dimensional stability. Ensure tiles are closely in contact with the floor and occasionally check for looseness to prevent
attachment failure. Immediately remove any adhesive on the product surface. Avoid exposing the tiles to direct sunlight immediately after installation in winter, as this may cause swelling. If the room temperature is low in winter, turn on a heater for a day to maintain an ordinary temperature and stop
heating at least 3 hours before installation.


After installation, avoid exposing the tiles to sharp changes in room temperature before the adhesive has sufficiently hardened, as this may cause the edges to loosen. Do not drag or move heavy objects on the tiles, as this may cause damage or warping. Use alcohol to remove contaminants from the surface but avoid using solvents such as acetone and thinner. Avoid contaminating the product surface with acidic substances that may cause discoloration. Wait 24 hours before walking on the tiles and wait 48 hours before moving furniture or turning on a heater to allow for complete hardening of the adhesive. Regular wax coating on high-traffic areas can improve durability and maintain color and design. Protect the installed products with a cover and tape to prevent displacement during use.


This document also includes cautions and warnings about handling and disposing of the product and adhesives. Avoid using polishes that may make the floor slippery and watch out for wet feet or socks on the floor to prevent slips. Handle the product carefully to avoid personal injury and property damage.

Use caution when disposing of waste to avoid toxic gas generation. Store the product in its original box on a flat surface, as stacking or standing it upright for a long time may cause deformation. Avoid exposing the tiles to direct sunlight or water, which may cause discoloration or deterioration. Use the
product only for flooring purposes. The adhesives contain a health-hazardous organic solvent, which may cause intoxication and hallucination when inhaled in large amounts. Wear personal protective equipment when working in a confined area and ventilate the area frequently for fresh air circulation. Fully ventilate the room for 2-3 days after installation to reduce the smell of the adhesive.

Chat now with our team
of live US-based
representatives by clicking the Chat button
in the lower left corner.

This white arrow indicates where to find the chat button to reach CoreLogic's support team.